A fully functional Video Player built using an ESP32-S3, an ST7789 TFT Display, and an I2S Amplifier. This project pushes the ESP32 to its limits to achieve smooth video playback with synchronized audio.
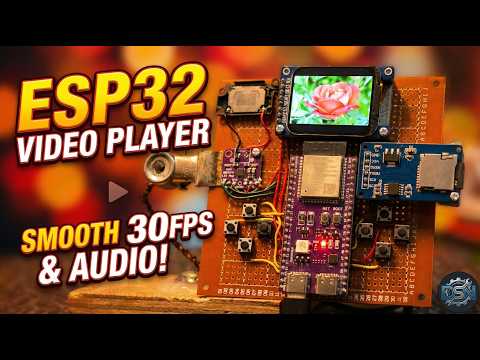
To build this project, you will need the following components:
- Microcontroller: ESP32-S3 Development Board (Recommended: 16MB Flash / 8MB PSRAM version)
- Display: ST7789 TFT Display (240x280 resolution)
- Audio: MAX98357 I2S Amplifier + Speaker
- Storage: Micro SD Card Module + Micro SD Card
- Controls: 3x Tactile Buttons
- Breadboard and Jumper Wires
| Component | ESP32 Pin |
|---|---|
| TFT Display | See User_Setup.h |
| I2S Amp (LRC) | GPIO 6 |
| I2S Amp (BCLK) | GPIO 5 |
| I2S Amp (DIN) | GPIO 4 |
| SD Card MOSI | GPIO 2 |
| SD Card MISO | GPIO 1 |
| SD Card SCK | GPIO 42 |
| SD Card CS | GPIO 41 |
| Button Up | GPIO 13 |
| Button Down | GPIO 14 |
| Button Play | GPIO 8 |
(Check the main Arduino sketch for the specific pin definitions used in this build)
- Open Arduino IDE.
- Go to File > Preferences.
- Paste the Espressif Board Manager URL into "Additional Board Manager URLs".
- Go to Tools > Board > Boards Manager, search for
esp32and install it.
Go to Sketch > Include Library > Manage Libraries and install:
TFT_eSPI(by Bodmer)JPEGDEC(by BitBank)
This is the most important step! You must configure the library to work with your specific driver and pins.
- Navigate to your Arduino libraries folder:
Documents/Arduino/libraries/TFT_eSPI. - Open
User_Setup_Select.h. - Comment out the default include line and uncomment the line for
User_Setup.h. - Open
User_Setup.hand define your specific pins (CS, DC, RST, MOSI, SCLK) and display driver (ST7789).
Raw video files (MP4, AVI) cannot be played directly on the ESP32. We need to convert them to MJPEG format using the provided Python script.
- VS Code : https://code.visualstudio.com/download
- Python installed on your system : https://www.python.org/downloads/
- Open VS Code and ensure the Python extension is installed.
- Install the required Python library by running this command in the terminal:
pip install imageio-ffmpeg
- Place your source videos (mp4, mov, etc.) into the
inputfolder. - Open the Python script in VS Code.
- Run the script. It will automatically process videos to the correct resolution (fixed width) and MJPEG format.
- Retrieve the converted files from the
outputfolder.
- Format your Micro SD card to FAT32.
- Copy the converted video files from the Python
outputfolder to the Root directory of the SD card. - Insert the SD card into the module.
- UP Button: Navigate up in the menu.
- DOWN Button: Navigate down in the menu.
- PLAY Button:
- In Menu: Selects and plays the video.
- During Playback: Stops the video and returns to the menu.
If the volume is too low:
- Open the Arduino Sketch.
- Look for the volume gain setting.
- Adjust the value between 0 and 21. (Recommended: 20).
If you found this project helpful, please consider:
-
Subscribing to the YouTube Channel.
-
Giving the video a Like.
-
Starring this GitHub Repository!
-
Patreon: [https://www.patreon.com/c/dsnIndustries]
Happy Making!
- Maze Escape: https://play.google.com/store/apps/details?id=com.DsnMechanics.MazeEscape
- Air Hockey: https://play.google.com/store/apps/details?id=com.DsnMechanics.AirHockey
- Click Challenge: https://play.google.com/store/apps/details?id=com.DsNMechanics.ClickChallenge
- Flying Triangels: https://play.google.com/store/apps/details?id=com.DsnMechanics.Triangle
- SkyScrapper: https://play.google.com/store/apps/details?id=com.DsnMechanics.SkyScraper